
Hey folks, it’s been a little while since I’ve posted and time for some fresh content here. This comes from a recent customer I worked with that had a very strange performance problem with a system they recently purchased. The customer had ordered a couple of Dell Precision T5820 systems with an nVidia GTX1080 and Tera2240 card and they were using some older Wyse P25 endpoints for remote workstation access (a pretty nice setup for doing remote graphics).
The initial problem called in on was that one of the systems would lose its CMOS Time when the system was started up remotely from the P25. Specifically, when the customer would turn on the workstation from the front power button of the Tower – everything was fine, but when the “power on” was sent remotely from the P25, the system would power on and stop pre-POST with the message “CMOS Time not set, Press F1/F2 to continue” – which everyone knows means the CMOS either got reset or lost it’s time configuration… but in this use case, why??
What is a Teradici Card?
A Teradici Host Access card is a pretty impressive widget for doing HD graphics (CAD, design, modeling) from a remote location. The HAC can accept input HD Video from an onboard video card, scrape 6 different functions off the motherboard via the PCI bus (keyboard, mouse, audio and several USB device channels), then compress and packetize all of those to send across your network to a hardware or software client with almost lossless video. This provides the end user access to a high quality user experience while the system stays secure at the office or in a datacenter (meaning: the data stays secured).
One additional cool feature of the Teradici Host Access Card (HAC, from here forward) is that you can remotely power up/down a system that has a Tera card installed. This is accomplished on the HAC through a 2-wire, power management cable that connects a jumper on the HAC to the Remote Power jumpers on the motherboard of the system where the HAC is installed (picture below).

Installation:
The picture above is a Tera2220 with Power Managment Cable attached to the card (white socket/circle). It’s a standard PCIe device and just plugs into a PCI slot in your system. If you have a dual socket system and only have one socket populated, check your motherboard documentation on which PCI slots are driven by the installed processor. If you happen to be in that scenario and plug it into a PCI slot that belongs to the empty 2nd socket, the HAC will power up (it pulls power through the PCI slot) and you will be able to access the WebInterface for the device (AWI), but it won’t be able to interact with the system (mouse/keyboard) because there’s no processor handling the I/O from that PCI slot. This scenario isn’t an uncommon problem and we’ve diagnosed it quite a few times.
Once installed in the PCI slot, there is also the Power Management Cable (PMC) to deal with. One end of the PMC should already be attached to the HAC. At the other end is what equates to a “splitter”. The power management cable can be used on systems with a Remote Power jumper on the motherboard, or on systems that only have a single power control jumper for the bezel mounted Power Switch. The port circled in red above is the connector that will be plugged into the Remote Power socket on the motherboard. The connector I’m holding (blue circle) is only used if you do not have the 2nd Remote Power jumper on your motherboard. In that instance, you will unplug the the bezel power cable plugged into the motherboard jumpers and plug the bezel power cable into the socket I’m holding, then plug the red circled connector into the power jumpers on the motherboard.
After that, use the supplied DisplayPort to miniDP cables to jumper the video out from your HD Graphics card into the Teradici HAC.
That’s it for installation. As long as you know where the Remote Power socket _is_ on the motherboard…
The Fail part…
After a lot of remote troubleshooting of the System, checking BIOS, sending a CMOS battery, Tera HAC configuration and other checks which I won’t bore you with, we got down to asking the customer for a picture of the area around the PCIe slots where the HAC was plugged in to see how “what is plugged in to where”.
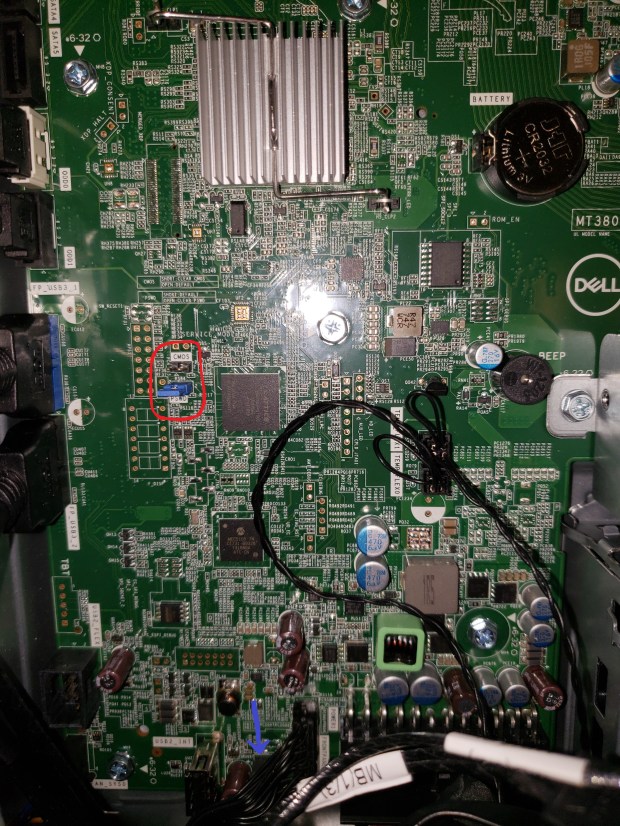
Once we got the picture of the motherboard, the picture became much clearer (all pun intended). Unfortunately, the only obvious jumpers exposed anywhere near the PCIe slots on the T5820 were: BIOS Password Reset & CMOS reset. The BIOS Password Reset jumpers are covered/jumpered by default on Dell systems and the CMOS jumpers were the only uncovered jumpers available (in the Red Circle below).
Somehow, some way, the Tera card’s Power Mgmt Cable had been plugged into the CMOS reset jumpers. So when they executed a remote power command from the P25, the Tera card was closing (read as: jumpering) the CMOS Reset and wiping the configuration. This explains how the front Bezel power-on didn’t exhibit the issue when used, but would wipe the config when doing power control from the Wyse P25.
Fortunately, the correct jumper socket for Remote Power was found next to all the Bezel control jumpers at the opposite edge of the motherboard from the PCI slots (noted by blue arrow, below), hidden under all the cables for the Bezel controls (and the socket wasn’t labeled either – that detail was pushed back to Engineering).
Once the Power Mgmt Cable was tapped into the Remote Power control socket, the system started working as expected.
Have y’all seen any odd outcomes from what would seem like a routine card installation?? Let me know in the comments…
Extra Resources:
Teradici Installation Instructions
